How to Use OWASP Amass: An Extensive Tutorial
Author: Nick Gkogkos
Source :-dionach.com

Amass Viz
Source :-dionach.com
The OWASP Amass project (Amass) can help with this to a large extent depending on your requirements. In this blog post, I will aim to demonstrate how one can use Amass to discover majority of an organisation’s externally exposed assets.
The focus will be on performing continuous subdomain discovery exercises. I have broken this blog post into different sections to make it easier to get to grips with the various functions of Amass. It should be noted that there may be assets out there that are not mapped to a domain and you will need to employ other techniques to uncover them, such as running network scans over the IP ranges owned by the organisation. Although I will not fully demonstrate how to use all the functions offered by Amass, I am hoping that this blog will cover enough to give you a kick-start in mastering Amass.
Why OWASP Amass?
A high number of open-source tools and software are available for enumerating subdomains, Autonomous System Numbers (ASNs) and other assets owned by an organisation. Although most of these tools are great in utilising specific methods, they are not always actively maintained and updated to keep up with the latest techniques and methodologies. So to speak the truth, most of the available tools are not complete and solely relying on these could give a false sense of security or lead to missing vulnerable assets. The reality is that subdomains can be disclosed anywhere nowadays, such as on social media, Pastebin, source code repositories, HTTP headers and so on.
Amass is backed by OWASP, which should provide prestige and confidence in the results. It is actively maintained and will likely be supported for a long time, meaning any future bugs will be resolved. Additionally, the adoption rate of Amass is high which potentially means better data consistency and integration with other tools. As such, it can constitute a better and more trustworthy tool to use in proof of concepts and engagements, and it may be easier to convince your clients or manager to use it for periodical mapping of the organisation’s attack surface.
There are a number of more technical reasons, which I will explain below and demonstrate in more detail later:
- Comes with 5 subcommands, in other words functions:
- amass intel – Discover targets for enumerations
- amass enum – Perform enumerations and network mapping
- amass viz – Visualize enumeration results
- amass track – Track differences between enumerations
- amass db – Manipulate the Amass graph database
- Amass’ subcommands can be used in conjunction, in some cases, which could allow you to create scripts that perform multiple Amass operations.
- Supports 55 sources, such as APIs and websites, at the time of writing as part of its subdomain discovery and information gathering techniques. These can be listed using the following command:
- amass enum -list
- An example of some of these is shown below
AlienVault,ArchiveIt,ArchiveToday,Arquivo,Ask,Baidu,BinaryEdge,Bing,BufferOver,Censys,CertSpotter,CIRCL,CommonCrawl,Crtsh,[…],ViewDNS,VirusTotal,Wayback,WhoisXML,Yahoo (full list here)
- It employs various information gathering techniques for DNS enumeration
- Brute-force of subdomains using a domain name wordlists and alteration wordlists
- Identify subdomains by reading SSL/TLS certificates, performing DNS zone transfers or checking certificate transparency logs
- Recursive subdomain discovery on identified domains
- Hashcat-style masks for brute-force of subdomains (this can be very useful if you have internal information on naming conventions and so on)
- It can be configured using a configuration file which makes it easy to maintain, use or integrate with scripts
Lastly, I will not be going into the details of installing Amass in this blog post, but if you are interested, you can do so in a number of ways. You can compile from source if you have a properly configured Golang environment (Go >= 1.13), or run it using Docker, or install it as a package if one is available for your distribution. Detailed installation instructions are available here https://github.com/OWASP/Amass/blob/master/doc/install.md.
Amass Intel
The Amass intel subcommand, or module if you want, can aid with collecting open source intelligence on the organisation and allow you to find further root domain names associated with the organisation. To see the available options of this subcommand, simply type it at the terminal:
$ amass intel
[...]
Usage: amass intel [options] [-whois -d DOMAIN] [-addr ADDR -asn ASN -cidr CIDR]
  -active
        Attempt certificate name grabs
  -addr value
        IPs and ranges (192.168.1.1-254) separated by commas
  -asn value
        ASNs separated by commas (can be used multiple times)
[...]
It is probably worth noting at this point that another great perk of Amass is that all the subcommands attempt to maintain argument consistency.
This subcommand will use a number of information gathering techniques and data sources by default, such as WHOIS and IPv4Info, in order to obtain intelligence and parent domains owned by the organisation, unless these are explicitly disabled in Amass’ configuration file. An example Amass configuration file is available on the GitHub repository.
$ amass intel -d owasp.org -whois
appseceu.com
owasp.com
appsecasiapac.com
appsecnorthamerica.com
appsecus.com
[...]
owasp.org
appsecapac.com
appsecla.org
[...]
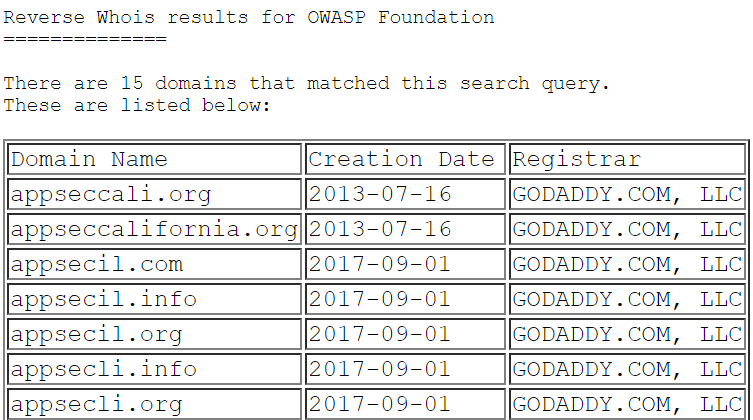
You can also confirm some of the results above by browsing to data sources manually. In the screenshot below, I have performed a reverse Whois search for “OWASP Foundation” and found similar domains against ViewDNS (which is also part of Amass’ data sources):

When performing searches with amass intel you can always run it with more configuration options, such as the “-active” argument which will attempt zone transfers and actively scan to fetch SSL/TLS certificates to extract information. As with any engagement, ensure you are authorised to perform active searches against the target at the time.
It is worth noting at this point that some configuration flags will not work along with others and in this case Amass will simply ignore them.
Amass’ findings will not always be accurate, this is due to several reasons, for example the data sources used by Amass may not be consistent or up to data. Amass attempts to further validate the information using DNS queries, and more validation techniques will be implemented in the future. Although Amass does a good job, users should still perform further verification checks on results that do not appear to be related to the target. This can be performed using a variety of methods such as:
- Use utilities to resolve the domains (e.g. dig, nslookup)
- Perform WHOIS lookups to confirm organisational details
- Search findings, such as parent domains, on search engines
You can also look for organisational names with Amass which could return ASN IDs assigned to the target, an example is shown below:
$ amass intel -org 'Example Ltd'
111111, MAIN_PRODUCT – Example Ltd
222222, SECONDARY_PRODUCT - Example Ltd
[...]
Please note that the above data is fictious for demonstration purposes. Retrieved ASN IDs could then be fed back into Amass. The below command attempts to retrieve parent domains on the specified ASN ID and return them along with the IP address they resolve to (127.0.0.1 in this case for demonstration purposes):
$ amass intel -active -asn 222222 -ip
some-example-ltd-domain.com 127.0.0.1
[...]
Amass Enum
Let’s move onto Amass enum, which is where most of Amass’ powerful capabilities live. Amass enum allows you to perform DNS enumeration and mapping of the target in order to determine the attack surface exposed by organisations. The enumeration findings are stored in a graph database, which will be located in Amass’ default output folder or the specified output directory with “-dir” flag. This is also the case with other Amass subcommands.
Run Amass under Passive or Active Configuration
Amass enum can be executed under the context of a passive or an active configuration mode. The passive mode is much quicker, but Amass will not validate DNS information, for example by resolving the subdomains. You can run it passively using the “-passive” flag and you will not be able to enable many techniques or configurations, such as DNS resolution and validation. There are several reasons for choosing passive mode over the active mode at times, for example:
- You need to know all possible subdomains that have been used and may be reused in the future, perhaps because you need to constantly monitor the target’s attack surface for changes or because you are working on a phishing engagement and looking for subdomains.
- Your perimeter’s security testing process validates DNS information at a later stage and need Amass results quickly.
- Due to a security engagement’s constraints or requirements, you can only perform passive information gathering.
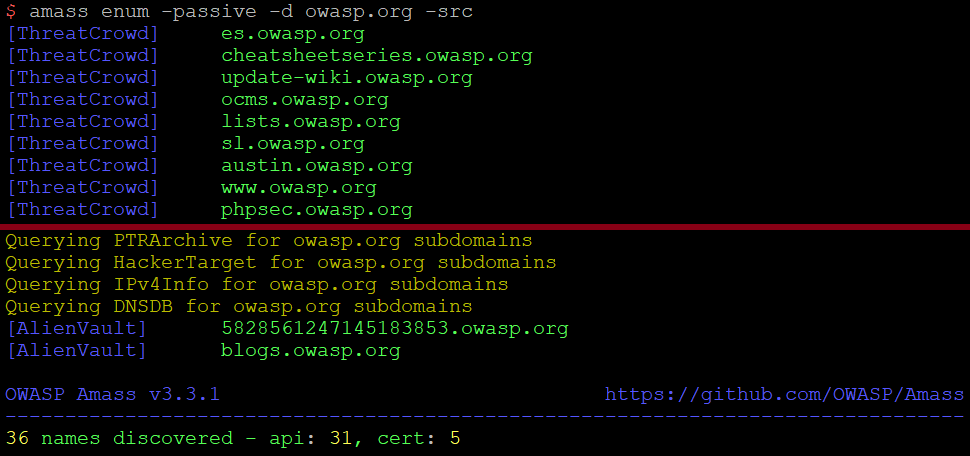
In the below example, I am passively searching for subdomains on owasp.org while asking Amass to display the data sources where it found each subdomain:
$ amass enum -passive -d owasp.org -src
[...]
[ThreatCrowd]     update-wiki.owasp.org
[...]
BufferOver]      my.owasp.org
[Crtsh]           www.lists.owasp.org
[Crtsh]           www.ocms.owasp.org
[...]
Querying VirusTotal for owasp.org subdomains
Querying Yahoo for owasp.org subdomains
[...]
It is worth stating at this point that although Amass intel will help gather IP ranges, ASNs and parent domains owned by an organisation, Amass enum will identify all subdomains. This subdomain enumeration is completed in under 2 minutes on my test machine. Here’s a slightly modified screenshot showing the results of this enumeration:

Using Amass in active configuration mode means that you will have more accurate results and more assets may be discovered as you can enable all DNS enumeration techniques. It should be noted that by “active configuration mode” I am not strictly referring to the “-active” flag which enables zone transfers and port scanning of SSL/TLS services and grabbing their certificates to extract any subdomains from certificate fields (e.g. Common Name).
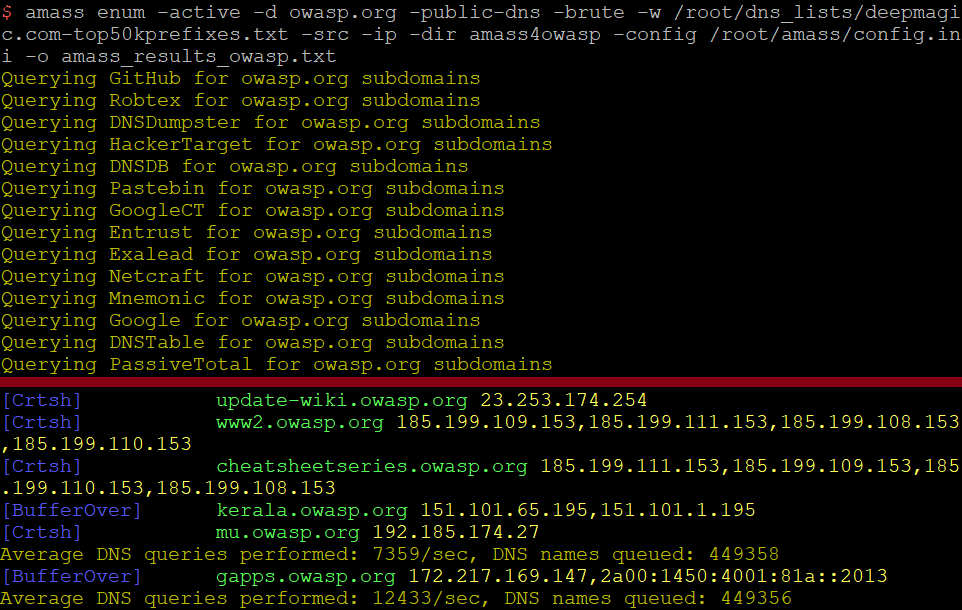
The below command (a detailed explanation of which follows below) can be considered active overall as it performs subdomain brute-forcing in multiple ways (wordlist, masks, etc.) along with the “-active” flag being enabled. All findings will be validated by Amass using the default or the specified resolvers:
$ amass enum -active -d owasp.org -public-dns -brute -w /root/dns_lists/deepmagic.com-top50kprefixes.txt -src -ip -dir amass4owasp -config /root/amass/config.ini -o amass_results_owasp.txt

The command I’ve used above specifies that the Amass graph database along with log files will be stored at “./amass4owasp”. I’ve also asked Amass to display the data sources for each identified subdomain and the IP address(es) it resolves to with the “-src” and “-ip” flags respectively. I have provided Amass with the deepmagic DNS wordlist with the “-w” argument, and also specified the location of the config.ini file with “-config” and the output with “-o”.
While the command above is hopefully straightforward, I would like to provide some further notes:
- As a result of the “-public-dns” argument, Amass will grab DNS resolvers from https://public-dns.info. Without this argument, it would have checked within my config.ini file or use the default resolvers embedded within Amass. Amass attempts to validate Public DNS resolvers, as shown in the snippet from the “amass.log” file below:

- We could have specified all these configurations in a config.ini file and provide this to Amass with “-config”. It’s worth stating at this point that command-line arguments will take priority over what’s specified in the config.ini file. So, if you are disabling brute-force in the config.ini file, but supply the “-brute” argument on the command line, then brute-force techniques will be used.
- The command above, unless explicitly disabled with the use of the “-norecursive”, will perform recursive DNS enumeration on subdomains identified by default.
Please note that you can specify your own DNS resolvers either with the use of the “-r” and “-rf” flags or within the config.ini file. Using the “-r” flag you can specify the IP addresses of DNS resolvers at the command, while with the “-rf” you can specify a file containing these.
At this point, you should also keep in mind that if you are performing multiple Amass operations within short periods of time from the same IP, the IP may be permanently blocked from some sources that Amass is scraping such as the Google/Yahoo search engines.
If you require multiple instances of Amass to be executed at the same time, you may be able to achieve this on the same server; however, bear in mind that Amass is powerful and will consume a lot of resources. Additionally, you will need to use the “dir” flag to specify separate output directories, and hence graph databases, when running multiple instances of Amass.
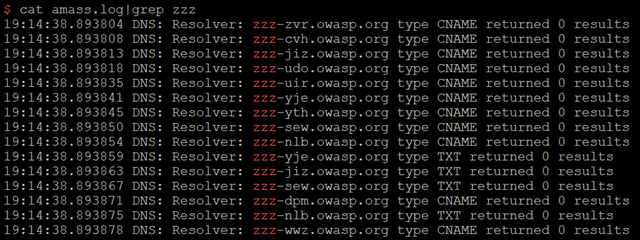
To conclude this section in a more interesting way, let’s assume that for some reason the OWASP organisation tends to create subdomains with “zzz” prefixes, such as zzz-dev.owasp.org. You can leverage Amass’ hashcat-style wordlist mask feature to brute-force all the combinations of “zzz-[a-z][a-z][a-z].owasp.org” using the following command:
$ amass enum -d owasp.org -norecursive -noalts -wm "zzz-?l?l?l" -dir amass4owasp
Note that in the configuration above I have explicitly disabled recursive DNS enumerations and alterations, as I was interested in quicker results using the mask only.
Finally, you can always check Amass’ log file within the output folder to ensure your configuration is working as expected:

Amass Track
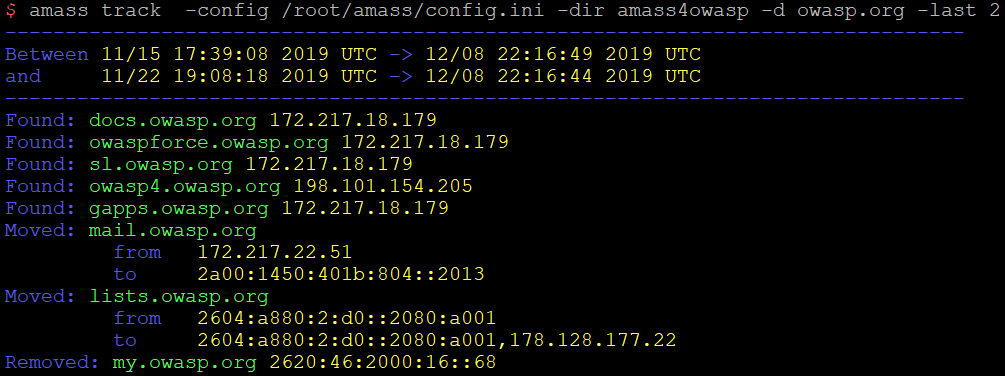
Amass track is the second most useful subcommand in my opinion. It helps compare results across enumerations performed against the same target and domains. An example is the below command which compares the last 2 enumerations performed against “owasp.org”. This is done by specifying the same Amass output folder and database we have been using in this blog. The most interesting lines are the ones starting with the “Found” keyword and this means that the subdomain was not identified in previous enumerations.
$ amass track -config /root/amass/config.ini -dir amass4owasp -d owasp.org -last 2

For organisations and researchers performing Amass discoveries periodically, Amass track can be really useful if used along with alerting. Although alerting is not yet natively supported by Amass at the time of writing, implementation of message notifications on identified track changes is in the development pipeline. Until this is implemented, you could investigate creating a custom solution that alerts the relevant people in your organisation by filtering the Amass track results. This could be done with Slack webhooks for example.
Organisations can also use this feature to ensure that newly deployed services do not evade quality control processes, vulnerability management, and asset inventories.
Amass Viz and Amass DB
I would also like to briefly mention the other 2 Amass subcommands:
Amass db
You can use this subcommand in order to interact with an Amass graph database, either the default or the one specified with the “-dir” flag.
For example, the below command would list all the different enumerations you have performed in terms of the given domains and are stored in the “amass4owasp” graph database:
$ amass db -dir amass4owasp -list
Next, with a command similar to the below you could retrieve the assets identified during that enumeration – in this case enumeration 1:
$ amass db -dir amass4owasp -d owasp.org -enum 1 -show
You may want to maintain the same Amass output folder for statistical or historical purposes, through which you perform all the subdomain enumeration exercises, as Amass track can be used only against the same graph database and output folder.
Amass Viz
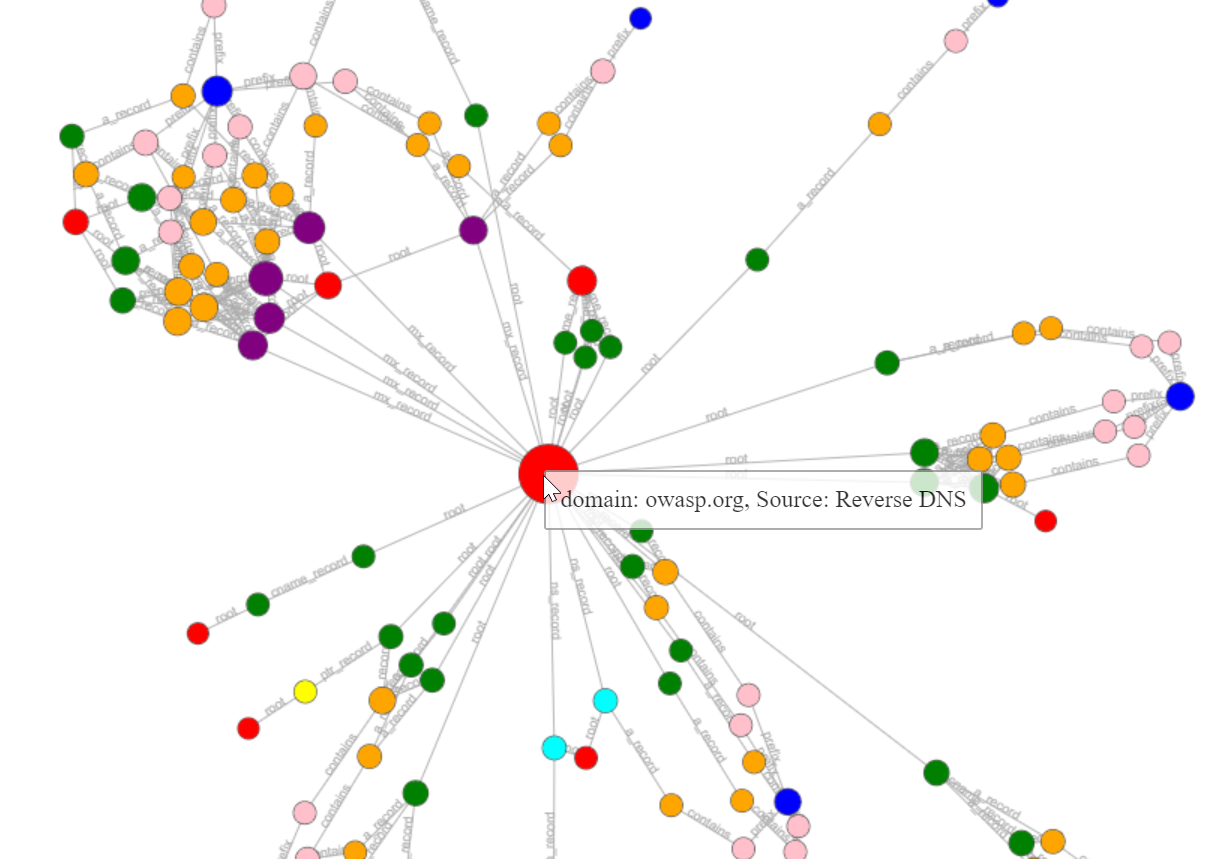
The Amass viz subcommand allows you to visualize all the gathered information (stored in the Amass graph database) for a target in a number of ways. Results can also be imported into Maltego for further OSINT (Open-Source Intelligence) analysis.
The below command generates a d3-force HTML graph based on the graph database stored within the “amass4owasp” folder:
$ amass viz -d3 -dir amass4owasp

Automating OWASP Amass Discovery Exercises
The discussed techniques could be used in conjunction with periodic information gathering and subdomain enumeration exercises. You could then write a script to send alerts when a new asset is discovered. Depending on your needs, here are some ideas:
- Use Amass intel to look for ASN IDs periodically, then use the ASN IDs to perform parent domain discovery, and finally use the identified parent domains with Amass enum running active searches in order to identify new externally exposed subdomains and assets;
- Use Amass enum with passive searches to retrieve new subdomains from Amass’ data sources in order to create a list of the organisation’s assets by providing the initial parent domains. These could be fed into vulnerability scanning tools (which will also perform DNS resolution) or could be added in scope for your organisation’s security engagements.
If you are planning on automating Amass discovery exercises, I highly recommend you invest time into configuring the “config.ini” file. For instance, you could have one amass “config.ini” file for quick passive subdomain discovery exercises that occur every few hours if you are searching a large network/organisation, and one for deeper and more specific scanning. In the example below, I provide an example script written in GNU Bash showing how you could automate Amass:
1. APP_TOKEN="$1"
2. USER_TOKEN="$2"

3. amass enum -src -active -df ./domains_to_monitor.txt -config ./regular_scan.ini -o ./amass_results.txt -dir ./regular_amass_scan -brute -norecursive
4. RESULT=$(amass track -df ./domains_to_monitor.txt -config ./regular_scan.ini -last 2 -dir ./regular_amass_scan | grep Found | awk '{print $2}')

5. FINAL_RESULT=$(while read -r d; do if grep --quiet "$d" ./all_domains.txt; then continue; else echo "$d"; fi; done <<< $RESULT)

6. if [[ -z "$FINAL_RESULT" ]];
7. FINAL_RESULT="No new subdomains were found"
8. else
9. echo "$FINAL_RESULT" >> ./all_domains.txt
10. fi
11. wget https://api.pushover.net/1/messages.json --post-data="token=$APP_TOKEN&user=$USER_TOKEN&message=$FINAL_RESULT&title=$TITLE" -qO- > /dev/null 2>&1 &
The script leverages a mobile application that sends push-notifications to my phone using the pushover.net API. This is achieved using the wget tool to make API requests that send a notification to my phone with the new subdomains, as shown in lines 1,2 and 11. You could implement similar functionality using Slack’s or Discord’s webhooks. The command in line 3 launches a thorough Amass enum discovery. Line 4 uses Amass track to compare the last two enumerations and identify any new subdomains while lines 5 and 9 accumulate all the subdomains identified within the “all_domains.txt” file and compare. This is required because in some cases subdomains may be active and/or inactive at different time periods and comparing only the last two enumerations may not be enough. Lines 6 to 10 ensure that the relevant push notification message is sent to my phone while also saving any new subdomains to the “all_domains.txt” local file for future reference.
Please note that the above script is a quick script I wrote and is only meant to serve as an example. It is by no means perfect and bug-free, and you will have to modify and adjust it based on your requirements and environment.
In closing, OWASP Amass is a tool that is becoming increasingly popular. I highly recommend that you incorporate Amass in your workflow/processes if you have information gathering and subdomain discovery requirements, and stay tuned as more and more features and improvements will be added with every release. Finally, you can always refer to Amass’ detailed user guide at:
https://github.com/OWASP/Amass/blob/master/doc/user_guide.md
https://github.com/OWASP/Amass/blob/master/doc/user_guide.md
Comments
Post a Comment